Monday, September 29, 2014

September 7th Cake

While looking through Maida Heatter's Book of Great Chocolate Desserts, I stumbled across September 7th cake. We have several September birthdays in the fam, so I jokingly said it was too bad no one's birthday was September 7th.   They decided it was close enough and requested it for the party.  Who came up with this crazy idea?  Oh, I think I did...


After some initial terror, I read through the recipe (all four pages of it) and decided I could make it. (I think I can! I think I can!) After the third reading, I realized that there is very little "cake" in this cake. It consists of two thin layers of a flour-less chocolate cake, with a filling of stabilized whipped cream frosted with more whipped cream mixed with 1/2 pound of semi-sweet chocolate and some coffee.  How could that possibly be bad?

So, full of confidence, I set about making the cake.  About 10 minutes into the baking, I smelled something burning.  I opened the oven and it didn't look too bad, so I turned it down to 350 and crossed my fingers.  Alas, it was a lost cause.  The cake was not only burned on the edges, but it the smell had permeated the entire cake (as well as the house).  I tried to save it by cutting off the burned parts, but by the time I got the first layer to something that looked cake-like, it was about 1/4" thick and 6" in diameter.  

At this point, the swearing commenced.


Oh the humanity! 
Right after I threw the whole mess in the trash, Farm Boy called and said a friend had invited us out to dinner.  Which was good because it meant that I didn't immediately try again.  When we got home, I started over, but inserted a new first step into the recipe:  Pour a glass of wine. 

Aaaaaahhhh

I lowered the oven to 350F this time (it may have even been slightly lower - see wine above).  This time instead of smelling like a coffee pot that has been on the burner too long, it smelled like chocolate. So much better.

Success!

The recipe gives very detailed directions on how to apply the icing with a pastry bag.  I decided that my sanity was more important than trying to pipe whipped cream icing in my warm kitchen, so I slapped it on with a knife and brushed it with a comb.  It's not as glamorous, but it was a lot faster.


This cake, as promised, is delicious, light and airy (and rich).  I would describe it as like eating chocolate air, but my favorite description of the day was, "It's like eating baby angels!". 


September 7th Cake (Printable Recipe )
from  Maida Heatter's Book of Great Chocolate Desserts

Layers
6 extra-large eggs, separated
3/4 cup sugar
1/4 cup plus 1 tablespoon unsweetened cocoa powder
1/4 teaspoon salt

Filling
3/4 teaspoon gelatin
1 1/2 tablespoons cold water
1 1/2 cups heavy whipping cream
1/3 cup powdered sugar
3/4 teaspoon vanilla

Icing
8 ounces semisweet chocolate
1/2 stick butter
1 tablespoon instant coffee powder
1/4 cup boiling water
2 cups heavy whipping cream
1/4 cup powdered sugar
1 teaspoon vanilla extract

Layers:

Preheat oven to 350F degrees (original recipe calls for 375F). Butter two 9-inch round layer-cake pans. Line the bottoms with rounds of wax paper or baking-pan liner paper cut to fit. Butter the paper and dust the inside of the pan all over with flour, invert the pans and tap to shake out excess flour.

In the small bowl of an electric mixer beat the egg yolks at high speed for 5 minutes until they are light lemon-colored. Add about half (6 tablespoons) of the sugar (reserve the remaining half) and continue to beat at high speed for 5 minutes more until the mixture is very thick and forms a wide ribbon when the beaters are lifted.

Add the cocoa and beat on lowest speed, scraping the bowl with a rubber spatula, and beating only until the cocoa is completely mixed in. Remove from the mixer and set aside.

Add the salt to the egg whites in the large bowl of the electric mixer. With clean beaters, beat at high speed until the whites increase in volume and barely hold a soft shape. Reduce the speed to moderate while gradually adding the reserved sugar. Increase the speed to high again and continue to beat until the whites hold a definite shape when the beaters are raised or when some of the mixture is lifted on a rubber spatula—they should not be stiff or dry.

In several additions, small at first (about a large spoonful), fold half of the beaten whites into the chocolate mixture. Then fold the chocolate mixture into the remaining whites. Do not handle any more than necessary.

Turn half of the mixture into each of the prepared pans. Gently smooth each layer.

Bake for 30 to 35 minutes or until the layers spring back when lightly pressed with a fingertip and begin to come away from the sides of the pans.

Remove from the oven. With a small sharp knife carefully cut around the sides of the layers to release them. Cover each layer with a rack, invert pan and rack, remove pan, peel off the paper lining, cover layer with another rack, and invert again to let the layers cool right side up.

While they are cooling the layers will sink and the sides will buckle and look uneven but don't worry. That is to be expected in this recipe. The filling and icing will cover them and they will be light, moist, and delicious.

When the layers are completely cool, prepare a flat cake plate as follows. Cut four strips of wax paper, each one about 10x3 inches. Place them around the outer edges of the plate.

Place one layer upside down on the plate and see that the wax paper touches all the edges of the cake.

Filling:

Sprinkle the gelatin over the water in a small heatproof cup. Let stand for 5 minutes. Place the cup in a small pan containing about an inch of hot water. Set over moderate heat and let stand until the gelatin dissolves, then remove from the hot water and set aside.

Reserve 2 or 3 tablespoons of the cream and place the remainder in the small bowl of an electric mixer (if the room is warm the bowl and beaters should be chilled). Add the sugar and vanilla. Beat only until the cream has increased in volume and holds a soft shape. Then quickly stir the reserved tablespoons of cream into the warm, dissolved gelatin and, with the mixer going, pour the gelatin all at once into the slightly whipped cream and continue to beat. The cream should be beaten until it is firm enough to hold a shape.

Place the whipped cream on the bottom cake layer. Carefully spread it evenly. Cover it with the other layer, placing the top layer right side up. Place in the refrigerator and prepare the icing.

Icing:

Break up or coarsely chop the chocolate and place it in the top of a small double boiler over hot water on moderate heat. Add the butter. In a small cup dissolve the coffee in the boiling water and pour it over the chocolate. Stir with a rubber spatula until the mixture is melted and smooth. Remove it from the hot water and transfer it to a medium-size mixing bowl.

Let the chocolate cool to room temperature, stirring occasionally.

When the chocolate has cooled, place the cream, sugar, and vanilla in the small bowl of the electric mixer. Beat only until the cream holds a soft shape. It is very important that you do not whip the cream until it holds a definite shape; that would be too stiff for this recipe and would not only cause the icing to be too heavy but would also give it a slightly curdled appearance. Everything about this cake should be light and airy, and the chocolate will stiffen the cream a bit more.

In two or three additions fold about half of the cream into the chocolate, and then fold the chocolate into the remaining cream.

Remove the cake from the refrigerator.

If you have a turntable for decorating cakes or a lazy Susan, place the cake plate on it.

Use as much of the icing as you need to fill in any hollows on the sides of the cake—use a spoon or a metal spatula—and then smooth the icing around the sides. If you are working on a turntable, rotate it while you hold a small metal spatula against the sides to smooth the icing.

Now the cake can be finished in one of two ways (depending on whether or not you want to use a pastry bag). You can either use all of the icing to cover the top very thickly, or you can spread it very thinly and reserve about 3 cups of the icing and decorate the top with a pastry bag and a star-shaped tube.

Place the icing on the top and spread it smoothly. Then spread the sides again to make them neat.

To decorate the top, which will be completely covered with rippled lines of icing, fit a 15-inch pastry bag with a #6 star tube and fold down a deep cuff on the outside of the bag. Place the icing in the bag. Unfold the cuff. Close the top of the bag. To form the icing lines, begin at the edge of the cake furthest from you, at the middle of the edge. Squeeze an inch or two of icing out of the tube in a line coming toward you. Continuing to squeeze and without stopping the flow of the icing, move the tube back away from you over about half the line you have just formed, making another layer of icing on the first. Still without stopping the flow of the icing, bring the tube toward you again and make another 1- to 2-inch line, then double back over half of this distance again. Continue across the whole diameter of the cake. The finished line will be along the middle of the cake. Make another, similar line to one side of the first, touching it. I find it easier to work from the middle—one side all the way and then the other side all the way to entirely cover the top of the cake with these wavy lines.

Remove the strips of wax paper by pulling each one out toward a narrow end.

Refrigerate for at least 6 hours or overnight and serve cold. To slice this cake without squashing it, insert the point of a sharp knife in the center of the cake. Then cut with an up-and-down sawing motion.

Monday, September 22, 2014

Jam Cake

Farm Boy asked for suggestions for his birthday cake and I supplied Margarita Ice Cream Pie and Blackberry Jam Cake (he stopped me after two options). I was certain he would pick the ice cream pie because it contains both ice cream and tequila, but he threw me a curve ball and picked the jam cake. Which meant I had to look for a recipe. Enter Betty Feezor.

I don't know what edition this is because someone ripped off half of the title page. I keep imagining it was a kid that was told to get rid of gum.... 


See where it says 'blackberry jam'?  You want to make sure it is seedless blackberry jam.  Trust me on that one.

I did some searching and most of the jam cake recipes seemed to be a spice cake sweetened with jam and most called for a caramel icing (that alone is enough to convince me!). Ms. Feezor didn't supply any frosting suggestions, so I went in search of a smallish caramel icing recipe and found one in the 1968 printing of Everybody's Favorite by the Minnesota Catholic Daughters of America.

This book came in a lot of cookbooks I bought online (to get a little WWII rationing booklet) and I thought it was so cute that the previous owner had written her favorite recipes and page numbers on the outside covers.  Then I discovered why: there is no index.  Hey, at least I know which recipes were considered winners!


Inside, the book has notes on many of the recipes, along with a few scraps of paper with shopping and to-do lists. It also included this little note. I hope Angela was forgiven.


I went with 'Caramel Frosting'


The cake went together easily and smelled divine while baking.  The frosting was also easy enough, although I stopped short of beating it to a spreading consistency and just drizzled it across the top.


The verdict*: it's a nicely flavored spice cake and, although it gives it a nice, moist texture, I can't really taste the blackberry jam.  The frosting is wonderful. It lost its sheen when dried and ended up having a crumbly praline-like texture.  I bet it would be great on a sheet cake with some toasted pecans. I tried to steal some of Farm Boy's frosting and nearly lost a finger.  It would have been so worth it.  The two of us can't usually finish a whole cake, but I guarantee none of that frosting will touch the trash can.

* I made one big mistake with this cake.  I grabbed the first jar of blackberry jam I saw at the grocery store and it was not seedless.  If you ever need to figure out which one of your teeth is sensitive, I recommend baking a cake with seeded blackberry jam.  The seeds turn into little tooth-crackers with the tenderness of granite chips. 

Jam Cake (Printable Recipe)
adapted from Betty Feezor's Carolina Recipes Volume 1

Ingredients
1 cup softened butter
2 cups sugar
4 eggs
3 cups flour
1/4 teaspoon salt
1 teaspoon nutmeg
1 teaspoon ground cloves
1 teaspoon allspice
1 teaspoon soda
1 cup buttermilk
1 cup seedless blackberry jam
1 cup chopped pecans

Directions
Preheat oven to 350F.  Grease and flour a 10-inch tube pan.

Cream butter and sugar.  Add eggs and beat until light and fluffy.  Mix together flour, salt, nutmeg, cloves and allspice.  Mix soda well with the buttermilk.  Add these 2 mixtures to the creamed butter and sugar, beginning and ending with the flour mixture.  Finally, fold in jam and nuts.  Pour into prepared tube pan.  Bake at 350F for 1 hour.  Let stand in pan for 10 minutes, then invert onto wire rack to cool completely.

Caramel Frosting
from the 1968 edition of Everybody's Favorite from the Minnesota Catholic Daughters of America

Ingredients

3 tablespoons butter
1/3 cup cream
1 teaspoon vanilla
2/3 cup brown sugar
1/8 teaspoon salt

Directions

Mix butter, cream, brown sugar and salt in a sauce pan.  Boil constantly until it reaches soft ball state.  Remove from heat, add vanilla.  Cool slightly, then beat until of spreading consistency.

Saturday, September 20, 2014

Bacon. Bourbon. Jam.

Okay, this isn't from my cookbook stash, but great googly-moogly it is good! I made it for Farm Boy's birthday and even though it requires hours of deliciously torturous bacon aroma while it cooks down, it is completely worth it. In fact, I had to give it to him a few days early because there was no way to disguise the smell in the house. 

So, if you like bacon, try the bacon-bourbon jam from Serious Eats.

I think I may go filch a bit, now that I'm thinking about it again...


Thursday, September 18, 2014

Malaga Sweet Potatoes

I had a couple of sweet potatoes that needed to be used, but I didn't want to just bake them like I normally do.  Growing up, I had only had plain baked sweet potatoes and always liked them.  Farm Boy had only been served the really sweet ones with marshmallows* on top and he hated them. I finally talked him into trying a sweet potato fry and he was all over it.  I'm pretty sure he heard bells ringing and romantic music playing, he liked it so much.


*Is that a thing outside of the southern U.S.?  My parents moved here from North Dakota (Nor-da-KO-ta), so most of my childhood food experiences were of the Midwestern variety.

Since I was already looking something up in my Idle Hour Cook Book, I checked for sweet potato recipes and found Malaga Sweet Potatoes.

chambers 90c idle hour cookbook


I didn't have any grapes, but I did have raisins and raisins are just really sad grapes, right?  So I poured some boiling water over some raisins and proceeded like it was meant to be.

A recurring theme in my cooking life is that if a recipe calls for both raisins and nuts, I am going to leave one of them out.  I can't tell you how many times I've pulled cinnamon rolls, cookies, etc., out of the oven and then noticed the bowl of raisins or pecans waiting patiently on the counter. At that point, foul language is used.


chambers 90c stove range
Looks good!  Wait, where are the #$%& nuts?!?

I didn't peel the sweet potatoes because I thought the skin made them a little easier to work with.  Farm Boy always eats the skin, but I just scrape the the flesh away from the skin when I eat them.  (Hmmm... that sounds a little Silence of the Lambsish... perhaps I should have an old friend for dinner...)

chambers 90c stove range
Nut-less and especially raisined raisins.  Roasted broccoli and pork chops in the background.

Chambers 90c stove range
Ta da!  The pecans magically appeared!  Too bad they didn't magically toast...

We liked these.  They were sweet without being overpoweringly sweet, although the raisins did dry out a little more than I would have liked.  I'm having a hard time imagining what it would be like cooked with grapes instead of raisins (does baking them just turn them into raisins?), so I might have to try it the way it was originally written.  And maybe I can overcome my mental raisin/nut hurdle if I trick myself by using grapes.  But after so many failed attempts, I have my doubts.


Malaga Sweet Potatoes (Printable Recipe)
from the 1950 edition of the Idle Hour Cook Book

Ingredients:
3 or 4 large sweet potatoes
salt and pepper
white grapes (or raisins, if you want to be like me)
brown sugar
butter
chopped nuts

Directions:
Scrub sweet potatoes and steam or bake until tender.  Peel (or not!) and cut in half lengthwise; scoop out a small amount of the flesh from each half to make a boat shape.  Place halves on baking pan and season with salt and pepper to taste.  Fill each section with grapes; sprinkle with 2 tablespoons brown sugar and dot with 1/2 tablespoon of butter; sprinkle with chopped nuts.

Bake at 375F for 20 to 25 minutes or until the sugar and nuts are browned.

Or if cooking with a Chambers, bake at 450F for 15 minutes and retained heat for 30 minutes or up to several hours, if needed.

Sunday, September 14, 2014

Bakewell Tart

I first read about Bakewell tarts about a year ago and I've been obsessed with them ever since.  A pastry crust spread with jam and then topped with an almond sponge.  I couldn't imagine how it could be bad!  However, I was convinced that they would be really hard to make.  Today I finally decided to really read the recipe and it turned out to be pretty simple.  It would have been even easier if my scale hadn't decided to run out of battery life in the middle of my measuring. To be fair to Scale, the battery must be at least 8 years old, but it would have been nice if it could have held on for a few more minutes.

For the recipe, I turned to my 1963 edition of Mrs. Beeton's Everyday Cookery. I found it locally and bought it with the idea that I would sell it, but it ended up moving into my bookshelf permanently.  I really don't know how that keeps happening!


So many other interesting looking desserts!
The recipe calls for a 7" flan ring or pie plate, but I have a thin, two-piece tart pan that needed to get out of the cabinet.  I think it's about 8" in diameter, so it seemed like a good fit.  I wasn't sure if the pastry was meant to be rolled out or just patted into the pan, so I decided to just pat it in.  That seemed to work just fine and I was able to easily remove the tart from the pan after it had baked.

In searching for other recipes, I noticed that some of the older ones called for bread crumbs instead of the cake crumbs.  I had two leftover biscuits, so I cut the crusty bits off of them and ground them in the food processor with the almonds. 

Since I had the food processor out and had already used it for the crust and to grind the almonds, I decided to mix the sponge in there, too.   Normally I don't worry about messing up the kitchen because Farm Boy does the cleanup, but since his birthday is coming up, I thought I would be nice to him. 


chambers 90c stove range


We really liked this!  The crust is tender and crumbly.  The filling tastes of almonds and is only slightly sweet.  The jam provides a nice, tart contrast without overwhelming the almond flavor.  It was really nice with afternoon coffee and I think it would be absolutely perfect with a cup of tea.  I may have to test that tomorrow with the leftovers.

Bakewell Tart (Printable Recipe)
from the 1963 edition of Mrs. Beeton's Everyday Cookery

Shortcrust pastry ingredients:
6 ounces flour
3 ounces butter
pinch salt
cold water

Directions:
Stir the flour and salt together.  Cut or rub the butter into the flour, then add enough cold water to make a stiff paste.  (I used the food processor and drizzled water in until the dough formed a ball.)  Pat into a small pie plate or tart pan.

Filling ingredients:
raspberry jam
2 ounces butter
2 ounces sugar
1 egg
2 ounces ground almonds
2 ounces cake crumbs
1/2 teaspoon almond extract
3 tablespoons sliced almonds
 powdered sugar, for dusting

Directions:
Line a 7-inch flan ring or pie plate with the pastry.  Place a good layer of raspberry jam on the bottom.  Cream together the butter and sugar until thick and white.  Beat in the egg and add the ground almonds, cake crumbs and almond extract.  Spread the mixture on top of the jam.  Top with the sliced almonds.  Bake in a fairly hot oven (400F) for about 30 minutes.

Sprinkle powdered sugar on top and serve hot or cold.

Serves 5 to 6.

Sunday, September 7, 2014

Raisin Pie with Crumb Topping

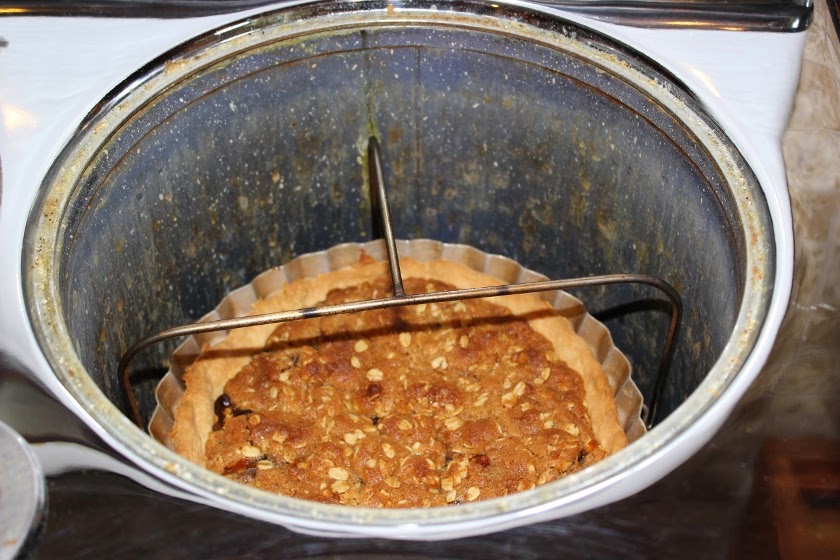
On the first Sunday of every month my family has a potluck dinner.  I really wanted to make something for dessert, but because Betty's oven was hard at work cooking a turkey, I needed to find something I could cook in the well. 


Chambers gas range stove thermowell
The insulated lid of the Thermowell. Most Chambers stoves have a Thermowell instead of a fourth surface burner. 

The Thermowell works like a slow cooker but with the addition of the Thermobaker, it can also be used as a small oven. 


Chambers stove range thermobaker
The Thermobaker or "Thermobaker".  The writers for the Chambers literature were very fond of quotation marks.


I whipped out my handy-dandy 1950 copy of the Idle Hour Cook Book - the recipe book and user manual for the Chambers ranges - and looked for potential pie recipes, finally settling on Raisin Pie.

chambers stove range idle hour cookbook


To make a smaller pie for the well, I halved the recipe.  Instead of a double crust pie, I thought it would be good to top the filling with an oatmeal crumb topping from one of Farm Boy's mother's famous recipes, Raisin Mumbles.  Mostly I thought this because I only had enough pie crust made for a single crust pie, but I also thought it sounded tasty.

While assembling the ingredients, I discovered that the lemons that I was sure were in the crisper were, in fact, limes.  I considered using lime juice in place of the lemon, but in the end I used dark rum instead.  Rum is a good substitute for lemon, right? 

After cooking the raisins, I had some doubts about there being enough filling, so I went ahead and kept the full amount (1/2 cup) of walnuts. 

Hmmm...  I'm beginning to see a theme in my cooking: I don't know what I have on hand and I substitute willy-nilly...


chambers stove range thermowell deep well
Someone needs to clean the well...  oh wait, that someone would be me.

chambers stove range thermowell thermobaker
All baked up!


Cell phone cameras under fluorescent lighting do not take the best pics.

This was a hit at the potluck and only a tiny bit made it home with us.  I see breakfast pie in my future!


Raisin Pie (Printable Recipe)
adapted from the 1950 edition of the Idle Hour Cook Book

Filling Ingredients:
1 single layer pie crust for 8" pie dish
1 cup seedless raisins
3/4 cups boiling water
1/4 cup sugar
1 tablespoon cornstarch
1/4 teaspoon salt
1/2 tablespoon grated orange rind
1 1/2 tablespoons orange juice
1 tablespoon dark rum
1/2 cup chopped walnuts

Topping:
1/4 cup soft butter
1/4 cup brown sugar
1/4 cup flour
pinch of salt
1/8 teaspoon baking soda
1/4 cup rolled oats

Directions:
Cook raisins in boiling water for 5 minutes; mix sugar, cornstarch, salt and add to raisins; cook about 3 minutes or until thick.  Remove from heat and add juice, rum, rind and nuts.  Pour into pastry-lined pie pan. 

Stir together the topping ingredients and drop in small bits over the top of the pie filling. The topping will come together as it bakes.

To cook this in the Thermobaker*, I preheated the well with the lid on for five minutes, placed the pie (in the Thermobaker) into the well, and replaced the cover, cooked with the gas on for 15 minutes and the gas off for 30 minutes.

I haven't tried baking this in a regular oven, but based on other recipes, I would bake it for 20 minutes at 425F, then lower the heat to 350F and bake for 20 to 30 more minutes, checking it at 20 minutes.


* Both the well and the oven on a Chambers are heavily insulated, so after a prescribed amount of heating time, you turn the gas off and let the food finish cooking with retained heat.

Saturday, September 6, 2014

Almond Crunch Green Beans

I had some green beans that needed  to be used and after perusing a few cookbooks for ideas, I came across Almond Crunch Wax Beans in my 1969 edition of Betty Crocker's Cookbook.


Being the rebellious sort, I decided to substitute my green beans for the wax beans.  Yeah, that's right.  I run with scissors, too.  Well, I would if I ever ran.  But I do walk fairly fast with scissors now and then.  Fine, I saunter with scissors.  (Please don't tell my mother!)

I did make a few changes to the recipe.  I left the beans whole, because they were the small, thin French beans.  I only had sliced almonds and I chose to toast them in the butter because, well, anything toasted in butter is better than anything that is dry toasted.  I then used the lovely browned and almondy butter when I cooked the beans.  Mmmm, almondy browned butter!

chambers stove range
I like to use this old baking pan because Farm Boy is convinced that all old enamelware pans are bed pans.
We really liked these.  The almonds were nice and crunchy and were a nice contrast with the beans.  They even tasted good as leftovers, but the almonds lost their crunch after being refrigerated and reheated.

Almond Crunch Wax (or Green) Beans (Printable Recipe)
from the 1969 edition of Betty Crocker's Cookbook

Ingredients:
3 tablespoons slivered almonds
1 pound fresh wax or green beans
1/2 cup water
2 tablespoons butter
3/4 teaspoon salt
salt and pepper to taste

Directions:

Cut beans into 1" pieces or leave whole, if the beans are small.

In a saucepan, melt butter over medium heat.  Add the almonds and cook until fragrant and beginning to brown.  Remove almonds with a slotted spoon and set aside, leaving the browned butter in the pan.

To the saucepan, add beans, water and salt and stir well.  Cover; cook 20 to 25 minutes* or until beans are tender.  When tender, drain the beans, season with a little salt and pepper, if needed, and top with the toasted almonds.

*My beans were really thin, so they cooked much faster, about 15 minutes total.

Wednesday, September 3, 2014

Date Gems

After some very subtle hinting on my part (as in I sent him the craigslist ad and said, "I want this."), Farm Boy gave me a a cast iron gem pan for Christmas last year. The first gems I made were such a hit that I immediately purchased a second gem pan for myself. (Yes, that is how my logic works.) Since the new pan had been sitting forlornly in the kitchen cabinet for several months, I thought it was time to give it a test run.

The "new" gem pan.
I remembered seeing a recipe for date gems in my 1941 copy of the Rumford Complete Cook Book, which came with this cute little rationing pamphlet tucked inside.


This is another of my books that appears to have been unused before it came to live with me.  I'm beginning to think that other people are a whole lot neater than I am.  Every book I have cooked from has the stains and notes to prove it!

The title of this recipe brings to mind a television program about good dating experiences.

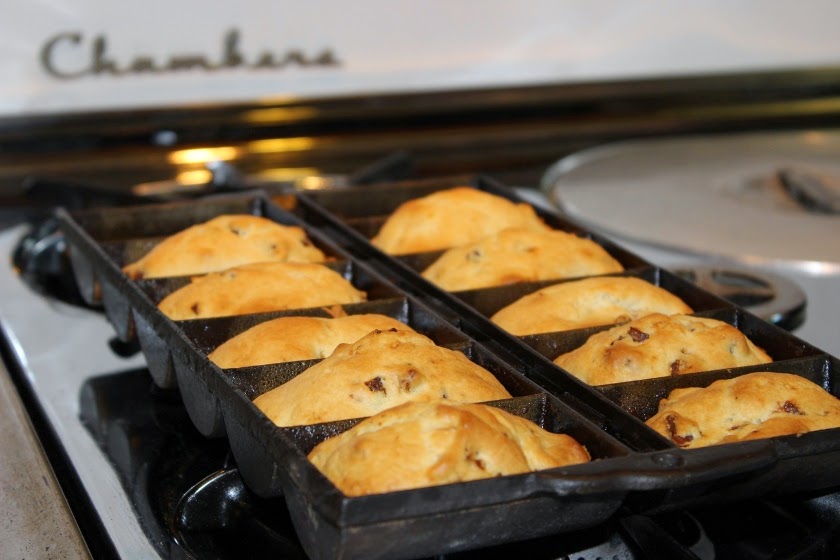
Gems are the precursor to the modern muffin.  They are smaller than today's muffins and the pans are heated in the oven while you are making the batter.   Once heated, you butter each section, giving each gem a yummy, buttery crust.

I would hazard the guess that part of why gems fell out of favor is that the gem pans vary wildly in size, which makes it hard to make recipes for them.  These round gems are about an inch and a half across.  About halfway through mixing the recipe, I started thinking that the amount of gem pan capacity I had was going to be greatly exceeded by the amount of batter in the bowl.  Fortunately I now have two gem pans(!), so I added the other one to the oven to heat up.


chambers stove range

It's a good thing, too, because I had enough batter to fill 10 out of the 12 sections in the second pan, which makes larger gems.

chambers stove range
I forgot to take a picture of the gems when they were removed, so you'll just have to use your imagination for that part.


While these received good reviews from my taste testers, they were a little plain in my opinion.  The date flavor was nice, but I think they could have used a little more sugar and perhaps something to add a little zing, such as orange zest.  I plan to try them again with some modifications, but I'm pretty sure I'll need another gem pan to do that...

Date Gems (Printable Recipe)
from the 1941 edition of the Rumford Complete Cook Book

Ingredients:
2 cups sifted flour
1/2 teaspoon salt
3 teaspoons Rumford Baking Powder
3 tablespoons sugar
1 cup chopped pitted dates  (I used Medjool dates)
1 egg, beaten
1 cup milk
1/3 cup melted shortening (I used butter)

Directions:
Sift flour, salt, baking powder and sugar, add dates and mix to a batter with egg, milk and melted shortening.  Bake in hot greased gem pans in a hot oven (400-425F) 20 to 25 minutes.  Makes 1 dozen.