Saturday, November 24, 2018

Andrea's Special Date Cookies

Growing up, summers involved trips to North Dakota to visit my mom's side of the family.  I don't know if it's a North Dakota thing or a Scandinavian thing, but at each home we visited, we were presented with a staggering array of foods and we were expected to eat some of everything, even if we had been to three other homes that day.  Lefse, ham, locally made summer sausages, rolls with actual farm butter, cookies, etc., always presented as if this was an everyday occurrence and we just happened to show up at the right time. 

The largest spread was always at Helga and Andrea's home.  Helga and Andy were sisters (and my mother's aunts) and even though Helga was married to Dave - and everyone adored Dave - it was never Helga and Dave, always Helga and Andy.  And Dave.

Great Aunt Andy, my sister and myself (the short one)
I was really too young to appreciate how much effort went into preparing all the food, but I do remember appreciating how delicious everything was.  Unfortunately, because we lived so far away, I never had a chance to learn any cooking secrets from them.  I was given Helga's roll recipe a while back, but I haven't worked up the courage to try them yet because Helga's rolls have achieved mythical levels of deliciousness in my memory.  I am fairly certain that nothing I could make would taste as incredible as what I remember.  Soft, buttery, light as a feather, slathered in unbelievably good salty butter.  Mmmmm....

Ahem.  Anyway.

A few years back my mom came across a recipe of Andy's, called Special Date Cookies. The instructions were something along of the lines of, "mix, crisscross with a sugar-dipped fork and bake."  People weren't sticklers for details  back in the day.  Mom remembered them as very good, pale and only lightly browned on the bottom.  Well, at least that was something to aim for!

I had intended to try these many times, but just never got around to it.  Then, a few weeks ago, I came across some Medjool dates that had gone hard and while trying to decide what to do with them, I remembered Andy's cookies.

I made a couple of changes to the recipe (because I can't leave things alone).  First, I halved it because it looked like it would make an enormous amount of cookies.  I'm glad I did, because I ended up with 47 cookies from a half batch.  Second, I rolled the dough balls in Sugar in the Raw before crisscrossing them because it seemed like a good idea.  We all liked the extra crunch the coarse sugar gave the cookies, so I'm sticking with it.

Technically, I suppose I made a third change.  The work bowl on my ~22 year old KitchenAid food processor was on its last legs already, and when I started trying to chop the dates in it, the blade seized up.  After several attempts to redistribute the dates for chopping, I added some bourbon to soften them.  It worked well enough to let me finish chopping those dates, but both the work bowl and the plastic cover on the spindle were broken beyond repair.  The motor still works, but alas, replacement parts are no longer available.  RIP, food processor.  You served me well.

For the record, I'm pretty sure Andy would NOT have approved of the addition of bourbon to her cookies!  I couldn't taste bourbon in the final cookies, but I did enjoy a few little bites of bourbon-soaked dates.  Hic!

Poor old food processor!

I wasn't sure how flat to mash the cookies while crisscrossing, so I tried some thinner (not all the way flat) and some thicker.  The thinner ones had the nicest final texture, I think.  I also guessed at 325F for the oven temperature, because I was afraid of over-browning them. 


The finished product!  I think these should have been mashed just a little flatter for the best texture

We really liked these cookies.  They have a nice date flavor and aren't overwhelmingly sweet, which we prefer, and the coarse sugar adds a nice texture.  They also keep well for several days.  We polished off the last one after about 8 days and while the texture had softened over time, it was still good.  As usual, though, I liked them best while still warm from the oven. 

Andrea's Special Date Cookies (Printable recipe)

Ingredients 
  • 3/4 cup soft butter
  • 1/2 cup sugar
  • 1 egg
  • 1 Tablespoon milk
  • 2 cups flour
  • 3/4 teaspoon cream of tartar
  • 3/4 teaspoon baking soda
  • 3/4 teaspoon salt
  • 3/4 teaspoon vanilla
  • 1 cup chopped dates
  • coarse sugar for rolling the dough balls (I used Sugar in the Raw)

Directions 

Preheat oven to 325F. Line baking sheets with parchment paper.

Combine the flour, cream of tartar, baking soda and salt and set aside. In a separate bowl, cream the butter and sugar together until light and fluffy. Add the egg and beat well. Stir in the milk and vanilla. Add the flour mixture in two or three additions, mixing well each time. Fold in the dates. Roll the dough into small balls, then roll in coarse sugar. Crisscross and flatten with a fork. Bake for 12 to 15 minutes, or until the cookies are lightly browned on the bottom only.

Monday, August 20, 2018

Tansey - 5th Annual Pieathalon


So a few weeks ago I am checking my email and what do I find? An invitation to participate in the 5th Annual Pieathalon! I played it all casual in my response, but I immediately ran downstairs to tell Farm Boy.  Well, "ran" is probably an exaggeration, but I did go downstairs and scream, "OMG! OMG! The cool kids are talking to me!"  He was very impressed.

The rules of Pieathalon are simple:
1) You choose a vintage recipe and send it in 
2) You receive a vintage recipe submitted by someone else
3) You make the recipe
4) You post about your experience

I looked through a lot of cookbooks for my submission and while I saw a lot of really nice sounding pie recipes, the one that really, truly spoke to me did not sound nice at all.  Heh heh heh.  I hope Jenny of Silver Screen Suppers who got stuck with Sweet Onion Pie (with raisins) can find it in her heart to forgive me.  Or at least never finds out where I live.

On the other end of the spectrum from a dessert with onions and raisins, the recipe I received - courtesy of Battenburgbelle - is full of heavy cream, eggs, ladyfinger cookies and sherry.  Oooh, promising!


The recipe is from Mary and Vincent Price’s Come Into The Kitchen Cook Book (1969). 


I happen to have a copy of this book (big surprise, I know).  It only has a few actual photos, but the whole book is full of cute illustrations like these. 

A cat!  You know that gets points from me.


I meant to take one of those "here are all my ingredients" photos, but I was distracted by The Oven of Regret.


It's actually a Knapp-Monarch Redi-Baker from the 1950s.  And it ended up in my kitchen because of a (possibly winey) evening of online shopping.  It has been sitting on the kitchen counter for about a week, just daring me to straighten out that old cloth cord and plug it in.  Since I had a little leftover pie crust and Farm Boy was away for the day (and thus I wouldn't kill both of us when it burst into flames), I decided to plug that bad boy in and make:

Pie crust cookies!

No sparks erupted when I plugged it in or turned it on.  There was a slight aroma of burning dust (with a piquant hint of musty old house) while it heated, but no flames or electrical shocks and the thermostat even seemed to work.  I was afraid that the heat would be uneven, given the small size of the oven space, but it worked like a champ.  Thank you for performing so well after 60+ years, Oven of Regret! I'm still not quite over my buyer's remorse, but I'm glad to know you aren't out to kill me.

Now, back to the pie.

Step 1 of the recipe called for cooking the egg yolks, cream, sugar, sherry, ladyfingers and nutmeg until thickened.  I wasn't sure how well to break the ladyfingers down, but they ended up cooking down into very small crumbs.


Step 2 was to add some green food coloring, if desired.  Normally I wouldn't bother with food coloring, but this is for the Pieathalon.  One simply does not commit half-assery during Pieathalon!

Ta-da!  It's green(ish)!
Step 3 calls for the egg whites to be beaten very stiff, then folded into the hot custard.  That mixture is then poured into the pie shell. 


I really wish I had taken a photo of the empty pie shell.  It was one of the better ones I have ever made.  Pastry is not my forte. 

Step 4 has us bake the pie at 450F for 10 minutes, reduce the heat to 350F and bake for 30 more minutes. 

 chambers stove oven range

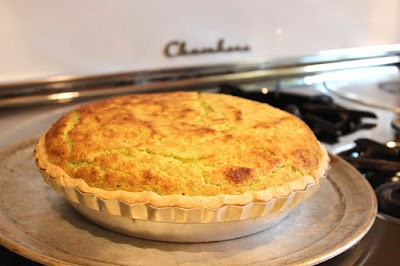
True to the description, the pie did puff up quite a bit and was nicely golden brown on top.  After cooling, it settled down to a normal pie height.

Now time for the tasting!


Farm Boy and my sister agreed to be taste testers for me, but the only one brave enough to be photographed was the queen of the house, Lily.

I am here to help

Chomp!

Blech!

How could you?
Results: Disappointing.

We all thought, based on the ingredients, that this would be really good.  But it has hardly any flavor at all.  If you use your imagination, you can almost taste the sherry, but overall it has the flavor profile of a graham cracker, but not quite as sweet.  And to add to the sadness, instead of a nice, creamy pie, the crushed ladyfingers just end up giving it the texture of cooked and then cooled/ congealed steel cut oats. 

In the end, while I'm sad to not have a pie that I want to add to my repertoire, I am thrilled to have participated in the 5th Annual Pieathalon.  Thank you to Yinzerella at Dinner is Served 1972 for organizing this event and for inviting me to join in on the fun.  And to Jenny of Silver Screen Suppers, I'm sorry about the onion and raisin pie!  Okay, not very sorry! <cue maniacal laughter here>

To read about the adventures of the other Pieathletes, visit their blogs:

Yinzerella from Dinner is Served 1972 with Kate's Pie
Surly at Vintage Recipe Cards with Dutch Peaches and Cream Pie
Kelli at Kelli's Kitchen with Chocolate Mousse Pie
Dr. Bobb of Dr. Bobb's Kitschen with Ritz Cracker Mock Apple Pie
Kelly from Velveteen Lounge Kitsch-en with Marguerite Patten's Cheese Pie
Jenny of Silver Screen Suppers with Sweet Onion Pie
Poppy Crocker at Grannie Pantries makes Strawberry Ginger Pie
The Battenburg Belle from Battenburg Belle serves up Frosty Vanilla Pie
Sally over at Mycustardpie.com with Mock Pecan Pie
Taryn from RetroFoodForModerntimes makes Vincent Price Pineapple Meringue
Camilla of Culinary Adventures with Camilla with Peaches and Cream Tart
Peter Fuller, Curator of the Vincent Price Legacy UK makes Puddin n'Pie
Renee Quintana from Tortillas and Honey dishes up French Raspberry Pie
The Unofficial Mad Men CookBook presents Aloha Meringue Pie
Retro Mimi of Once Upon a Salad gives us The Millionaire
Sue of Vintage Cookbookery makes Yul Brenner's Walnut Pie
Wendy from A Day in the Life on the Farm presents Tyler Pie
Clara Silverstein of Heritagerecipebox.com makes Olde English Egg Nog Pie
S.S. of A Book of Cookrye makes Cool Mint Cookie Pie
Debra of Eliot's Eats with Apricot Meringue Pie
Judy Gelman and Vicki Levy Krupp from BookClub CookBook serve up Weight Watcher's "Almost a Pie"
Greg Swenson of Recipes4Rebels makes Seafoam Cantaloupe Pie
Kaci of Homicidal Homemaker creates Lemon Beer Sponge Pie


Sunday, August 12, 2018

Boiled Custard for Two

Last week I happened upon a great deal on really nice looking berries.  I grow some fruits here, but by August there isn't much happening in the fruit department in Texas, except melons.  So when I saw fantastic looking blueberries, strawberries and raspberries (oh my!) at prices that didn't make my cheapskate heart seize up, I pounced!

After eating a few bowls of plain berries, I started thinking about how good they were with zabaglione.  But when I whipped out The Boston Cooking School Cook Book (1942 edition), boiled custard caught my eye.  And if boiled custard is good with sherry, it would (obviously) be good with marsala. 


We didn't want or need leftovers of this, so I reduced the recipe, more or less thirding it (is that a word?).  I used a tablespoon of the wine (which was spot on) and 2 tablespoons of raw sugar.  I think it could have used a touch more sugar, though, or slightly sweeter berries.  I think I will try 3 tablespoons of sugar next time. I also didn't catch the "scalded" bit in the milk measurement, so mine was straight out of the refrigerator.  It worked just fine.

Since I wanted to serve it as individual servings, I chose to go ahead and pour it into little dishes to chill.  For some unknown reason, a few years ago I started compulsively buying old Big Top Peanut Butter glasses at garage and estate sales.  In order to justify all the room they take up, whenever I make make a dessert that would be served in a bowl, I have to use the Big Top glasses. I can't let Farm Boy have any excuse to disappear them!


Hmmm.  I just realized that I have about 20 of the short ones, but only one of the tall ones.  I might need to add to the collection.  One more can't hurt, right?  I mean, Farm Boy and I should each have one.  It's only fair. 

Look at those cute peanut butter glasses!

Boiled Custard for Two (Printable recipe)

Modified from The Boston Cooking School Cook Book (1942)

Ingredients
  • 2/3 cup milk
  • 1 egg
  • 2 to 3 Tablespoons raw sugar
  • pinch salt
  • 1 Tablespoon marsala wine (I used dry marsala)
  • Slightly sweetened berries and crushed amaretti cookies, for topping

Directions
Beat eggs with a whisk, then add sugar and salt.  Add milk gradually, stirring constantly.  Cook and stir in double boiler over hot (not boiling) water, until mixture coats a spoon (about 7 minutes).  Remove from heat, stir in marsala wine.  Strain, if desired, pour into serving dishes, and chill.

When ready to serve, top with berries and crushed cookies.

Friday, July 27, 2018

Baconized Corn

A few weeks ago I was thumbing through some cookbooks looking for recipes for fresh corn when I stumbled upon this gem:


Baconized?  I didn't realize it was a thing to baconize foods, but I have to think almost anything could be made better by the baconizing process!

The recipe was found in the Mennonite Community Cookbook by Mary Emma Showalter (1950). 


I didn't have any bacon that particular day, but I did make a note to try some baconized corn in the near future. The future is here.

I followed the recipe exactly as written (crazy, right?).  I cut the corn off the cobs and mixed it with sugar, salt and pepper.  Placed it in a buttered casserole dish and topped it with diced bacon.  Easy peasy.  I did have to bake it slightly longer than the recipe called for, but my bacon was probably not "finely" diced.

Before baking


After baking.  The bacon is crispier than it looks, I promise!
For such a simple process, this was really good.  I think the key is the fresh corn, which came out very tender and corn-y.  I think the skin on frozen corn would be a touch on the leathery side.  Canned might work, but it's not something I usually have on hand.  We had a little bit leftover, which I mixed into some cornmeal pancakes the next day.  Which sounds odd, but it worked. 

Baconized Corn (Printable recipe)

from the Mennonite Community Cookbook by Mary Emma Showalter (1950)


Ingredients
  • 4 cups fresh corn
  • 1 teaspoon salt
  • 1/4 teaspoon pepper
  • 1 1/2 teaspoons sugar
  • 1 cup finely diced bacon

Directions
Place corn in a greased baking dish.  Season with salt, sugar and pepper.  Cover entire top of dish with finely diced bacon.  Bake at 350F for 35 minutes or until bacon is crisp.  Serves 6.


Tuesday, July 17, 2018

Scalloped Eggplant

I'm baaa-aack! My garden luck this year has been pretty spotty, some issues due to weather, some to the local varmint population (I curse you, pocket gophers and squirrels!), but the thing that is doing awesomely is a single Japanese eggplant. It is huge and loaded with long, skinny fruits. I can only justify frying them so often and I've already got enough roasted and frozen to make baba ganoush all winter long. Time to find something else to do with eggplant... enter the Mennonite Community Cookbook by Mary Emma Showalter.


I picked this little gem up a few years ago and while I haven't explored a lot of it, I do appreciate all the great vegetable dishes it contains.  There is one for "Baconized Corn" that I haven't tried yet, but it's on my to-try list.  I need more baconized foods in my life.


The eggplant: not just a vegetable, also a good book flattener!

As usual, I took a few liberties with the recipe so I could use what I had on hand, starting with about 8 long skinny eggplants instead of one large.  I'm guessing that my skinny eggplants did not add up to a large one, but I liked the end result. For my second variance, I replaced the tablespoon of green pepper with some fresh minced basil and then added some cubed marinated mozzarella that needed to be used up.  And in one final act of rebellion, I diced the bacon instead of just laying the strips across the top. 

Baconized eggplant!


Farm Boy and I really liked this.  The whole eggplant/tomato/basil combo really works and is complimented by the mild cheese and the bacon. The original recipe claims 5 servings, but we got 4 side-sized servings out of this.


Scalloped Eggplant (Printable recipe)
based on a recipe from The Mennonite Community Cookbook by Mary Emma Showalter, 1950


Ingredients
  • 1 large eggplant
  • 1 cup diced tomatoes
  • 1 Tablespoon minced fresh basil
  • 4 ounces Italian-marinated fresh mozzarella, cubed
  • 1/2 teaspoon salt
  • 1/8 teaspoon pepper
  • 1 cup soft breadcrumbs
  • 2 Tablespoons butter, melted
  • 3 strips bacon, diced

Directions
Preheat oven to 400F.
Peel eggplant and cut into 3/4" cubes.  Cook in salted water until tender and almost dry.  Add tomatoes, basil, mozzarella, salt and pepper and stir well.  Pour into a greased baking dish.  Combine the bread crumbs and melted butter and spread over top of eggplant mixture.  Top with diced bacon.
Bake for 20 to 25 minutes, or until bacon is cripsy and breadcrumbs are golden.