Saturday, September 26, 2015

Chambers Thermowell Creole Fish with Vegetables

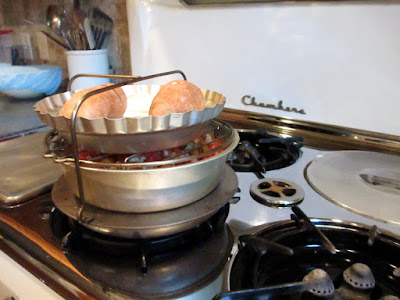
This recipe comes from a pamphlet that Chambers published to promote the Thermobaker, which allows you to use the deep well as a small oven.  The Thermobaker is really just a heat shield that protects foods from the direct heat of the well burner, with the addition of a handle that lets you get the hot pans out easily. 

The Thermobaker was introduced with the model C Chambers and had to be purchased separately, so they are a little hard to come by.  When we went to pick up a freebie Chambers cooktop (which is destined to one day be part of an outdoor cooking cart, aka the Great Outdoor Baconator), the guy asked me if I wanted "one of those pie baker thingies" that he had sitting in his garage.  I had to restrain myself from galumphing into his arms like an overgrown puppy.  I managed to mostly maintain my poker face and croaked out a subdued, "Yes," then screamed like a banshee when Farm Boy and I got back in the pickup. 

Ahem.  Perhaps I need to get out more.

Mostly I use the Thermobaker to bake small cakes or pies because it adds no noticeable heat to the kitchen, which makes a big difference in our Texas summers.  However, I have been wanting to utilize it for more main dish or entire meal cooking.  Enter Creole Fish with Vegetables:
The writers of the Chambers literature were "really" into quotation marks


I used cod for the fish, because that is what we had in the freezer.  I replaced the garlic salt and basil with Howie's Cajun Dust, which a local Cajun restaurant keeps on the tables to sprinkle on the free coleslaw.  They sell the seasoning mix at the checkout, which I'm sure offsets the cost of the coleslaw! 

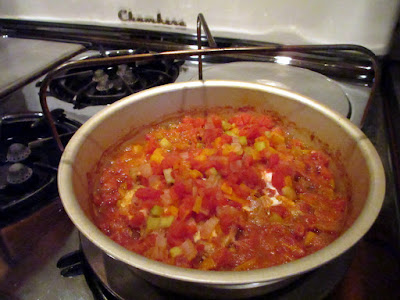
Colorful!


chambers 90c stove range thermobaker
Before.  All stacked up and ready to go.

chambers 90c stove range thermobaker

chambers 90c stove range thermobaker
After.  Although the sweet potatoes don't look that much different than before!

chambers 90c stove range thermobaker

Both Farm Boy and I really liked this.  I wasn't sure about fish cooked with such a large quantity of tomatoes, but it really worked.  I might go a little lighter on the celery next time, but that's just my own anti-celeryite tendencies showing. 

Monday, September 14, 2015

Fruit-filled Meringue or Angel Pie

Last summer my aunt pointed out Angel Pie in the 1950 Betty Crocker's Picture Cook Book and told me that I needed to try it.  I promptly forgot about it and didn't think of it again until we went grocery shopping last week and came home with a ridiculous amount of raspberries and strawberries.  The raspberries we managed to mostly consume during the week, but we still had an unopened giant container of strawberries when the weekend rolled around.  I thought of making an angel food cake to serve with them, but then remembered my aunt's recommendation of the meringue shell "pie".

Good ol' Betty Crocker!


While I have attempted a few meringue-topped pies, this was my first time to make a crunchy meringue.  I really liked it!  I think I could eat the meringue all by itself, without the berries and whipped cream.  (Farm Boy looked at me like I had lobsters crawling out of my ears when I said that - he says that the whipped cream is required.) 

I'm assuming that any topping/filling that doesn't require baking could be used to make an angel pie, but the recipe does specifically call for a lemon curd filling. Perhaps I am committing meringue blasphemy by filling it with berries, but I think it is worth the risk. 


The one problem I encountered was that the meringue stuck to the pie pan.*  I think next time I will just mound the meringue onto a parchment-lined baking sheet and form a higher ridge around the edge to form the "bowl" shape, like the heart-shaped one in the recipe photo.  I think that would make serving it a lot easier and a lot less messy. 

*Incidentally, I just noticed that the recipe calls for a 9" round layer pan instead of a pie dish.  I must have read this recipe 25 times and I missed that every time.

Angel Pie  (Printable recipe)
Adapted from Betty Crocker's Picture Cook Book (1950)

Ingredients
  • 3 egg whites
  • 1 cup sugar
  • 3/4 teaspoon lemon juice

Directions
Preheat the oven to 275F.  Line a 9" round cake pan or a baking sheet with parchment paper.  Beat egg whites until stiff (holds a point).  Gradually beat in 1/2 cup sugar, then beat in remaining sugar, alternating with lemon juice. Continue beating until very stiff and glossy.  Spoon the meringue into the pie dish or onto the baking sheet into desired shape.  Bake until delicately browned and crusty, 60 minutes for one large meringue or 40 minutes for smaller, individual meringues.  Cool completely.

Fill with whipped cream or ice cream and fruit or pre-cooked filling of your choice, such as lemon curd.

Wednesday, September 9, 2015

The Oddly Named Mocha Squares

It has long been told in family lore how my mom used to make "mocha squares" when my oldest sister was a kid and everyone loved mocha squares.  Until Oldest Sister had an unfortunate bout of foodborn illness after eating chow mein and mocha squares.  After that, she refused to eat them ever again.

This was long, long before my time (let's see if Oldest Sister reads this...), so I had only heard of mocha squares, but never tasted them.  I asked Mom what they were and she described a vanilla cake with white frosting and peanuts.  Um, where is the chocolate?  Where is the coffee?  This made no sense to me.  Until I borrowed Mom's cookbook.


Tried Recipes, Grafton Lutheran Ladies Aid (1961)

There in the tattered book was the recipe for mocha squares. 


I did internet searches for mocha squares and found recipes for bars that involved chocolate and coffee, which is exactly what someone would expect from the name.  Finally, in desperation, I searched for "cake squares frosted peanuts" and saw that the rest of the world calls these peanut squares or peanut cake squares.  That makes so much more sense!

Because I am such a good sister, I whipped up a batch of so-called mocha squares to share with Oldest Sister at our weekly tea and crumpets.


Lily lends a paw to the baking process

They were fairly easy to make and tasted delicious while fresh.  I gleefully arranged them on a cute 1950s platter and drove them to my mother's house where I waited for Oldest Sister to arrive so I could tell her I made her most-hated food*.  And she had the nerve to not show up that day.  Drats, foiled again!


chambers 90c stove range
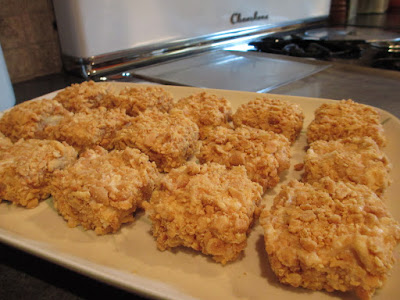
Mocha squares!
I think I will leave the recipe off this time because while these were quite delicious initially, the cake became... gummy... once refrigerated.  I think there is probably a better recipe for peanut squares out there.  I will try again sometime in the future because the combination of the sweet frosting and the salty peanuts was really nice.  I just didn't care much for this particular cake recipe.


*Lest anyone think that I am more evil than I really am, I have a similar story involving cherry pie with canned cherry pie filling, which I cannot stand to even smell to this day.  Oldest Sister has made several things with cherry pie filling, so this was an act of revenge, not outright aggression.  Too bad it didn't work out. <sigh>

Sunday, September 6, 2015

Pineapple and Marshmallow Dessert aka Pineapple Marlow

A few weeks ago I watched the following promotional video for electric appliances 1934:

Mrs. Mortimer Jones Prepares "Dinner for Eight"


I was fascinated by all the old appliances in their shiny new states and thought they must have been a welcome change from having to do everything by hand.  Of the foods Mrs. Mortimer Jones prepares, the one that caught my attention was the orange marlow for dessert.  Well, to be perfectly honest, I couldn't understand what the narrator was saying, but I did get "orange" and "dessert".  After some searching, I figured out that he was saying marlow.  More searching revealed that a marlow is a frozen dessert made with melted marshmallows.

Shortly after learning about marlows, my mom let me borrow one of her older cookbooks, Tried Recipes by the Grafton Lutheran Ladies Aid, Grafton, North Dakota (1961).   My grandparents lived in Grafton, so I looked through every recipe in the book hoping that there would be some from my grandmother, but apparently she didn't contribute any.   Grandma was known for her cooking, but apparently not into sharing her recipes!  I did find a few a few recipes contributed by her sisters, though, which was fun.


While looking through the book - which is comprised almost entirely of recipes for sweets! - I found several recipes for marlows, although most were simply called frozen desserts by the 1960s.  The pineapple one caught my eye, so I decided to give it a go.


The recipe came together fairly easily.  I was a little pressed for time, so I chilled the pineapple juice and melted marshmallow mixture in the refrigerator, but this resulted in it setting into a loose gelatin.  It mixed up fine, but I was surprised when I took it out and it was starting to set.


chambers 90c stove range

Since most of the other recipes I looked through called for the marlow to be placed in the freezer, I froze mine for two hours before serving. 


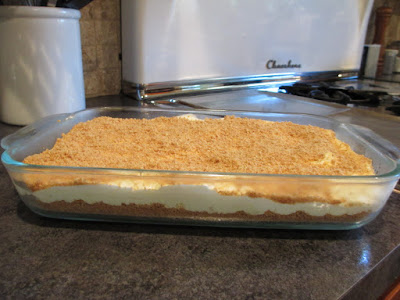
The verdict: This is a nice, not-too-sweet dessert that is perfect for a hot summer day.  The combination of the heavy cream and the marshmallows makes it fairly rich, so I would plan on much smaller servings next time.  Most of the recipes I found did not call for the graham cracker crust, but I thought it added a nice contrast and cut some of the richness.  Plus, graham cracker crusts are just darned good!


Daisy says she likes pineapple marlow, too!

Pineapple Marlow  (Printable recipe)

from Tried Recipes by the Grafton Lutheran Ladies Aid, Grafton, N.D. (1961)


Ingredients
  • 1 cup pineapple juice
  • 1 cup crushed pineapple
  • 30 marshmallows
  • 1 cup whipping cream, whipped
  • 16 crushed graham crackers
  • 1/4 cup melted butter
Directions
Put juice in double boiler, add marshmallows, stir until dissolved.  Cool, add whipped cream and crushed pineapple.  Put in 9" square pan lined with cracker crumbs which have been mixed with butter.  Sprinkle more crumbs on top.  Place in freezer until firm.

Thursday, September 3, 2015

Baked Onions

This cookbook is a recent addition to the hoard.  After a few weeks of finding nothing on my treasure hunting outings, I was ecstatic to see a vintage cookbook at a reasonable price.  When I opened the book and saw a recipe for sweet potato pone - which I had recently read is supposed to be pronounced as, "poon"-  I knew it was going home with me.


While thumbing through it, the recipe for baked onions caught my eye.  Farm Boy's mother used to make baked onions that were delicious (although I admit to being skeptical the first time she served me a whole onion...).  I hadn't thought about them in years, so when I came across this recipe, I decided it was time to bake onions again.


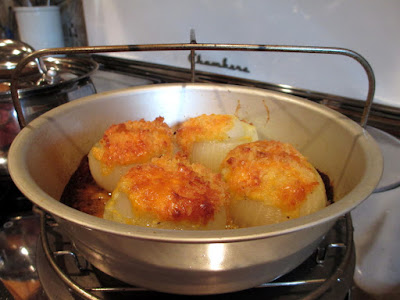
Alas, I didn't pay attention to the bit about cooking the onions first and then filling them.  I put the filling in and baked them with foil over the pan, then removed the foil for browning.  This resulted in a pan coated with really, really hard cooked cheese.  The onions were still delicious, but it required several soaks to get the pan clean.  The second time I made them, I buttered the dish first and added the cheese and bread crumbs only for the last 15 minutes of baking.  Much less mess!

It's nice to have baked onions back in our food rotation, especially when the locally grown sweet Noonday onions are available. Now I just have to not let them fall off my mental list again...


Chambers 90c Thermobaker stove range
What's that on the bottom of the pan?  Oh, it's burned-on cheese.  Glad I'm not on the clean-up crew! 


Baked Onions (Printable recipe)
loosely interpreted from Crestview Culinary Collections Crestview Christian Church, Greenville, Texas (1962)
Ingredients
  • 1 medium onion per serving
  • Salt and pepper or seasoning mix of your choice (I have used both Greek and Cajun)
  • grated cheese
  • Panko bread crumbs tossed with melted butter

Directions

Preheat the oven to 375F.
Peel the onions.  Cut a small slice off the root ends, so that the onions will sit flat.  Cut the tops off and remove a cone-shaped piece from the inside of each onion.  Sprinkle the inside with the seasonings, then place the onion in a buttered oven-proof dish.  Place a top on the dish or cover with foil.  Bake for 30 minutes.
Remove the cover and fill each onion with grated cheese.  Top with buttered bread crumbs.  Bake, uncovered, for another 15 to 20 minutes, or until the cheese is melted and the bread crumbs are browned.